Installation
System Requirements:
- Node.js 16.8 or later.
- Windows and Linux are supported (I do not have a MAC to test if it works).
Automatic Installation
We recommend starting a new Previous.js app using create_previous_app, which sets up everything automatically for you.
1. Run the following command to download the creation script:
powershell -Command "Invoke-WebRequest -Uri https://raw.githubusercontent.com/necrotxilok/previous.js/main/create_previous_app.bat -OutFile create_previous_app.bat"
wget https://raw.githubusercontent.com/necrotxilok/previous.js/main/create_previous_app.sh
2. Create the new application running:
create_previous_app.bat MyApp
bash ./create_previous_app.sh MyApp
This command creates a folder in current directory called MyApp with all the necessary files.
Good to know
Save this script into a custom PATH enviroment directory to create Previous.js Apps from any directory in your system.
Manual Installation
1. Download Previous.js latest release from GitHub.
2. Uncompress all the contents from the folder src/ into the desired app folder. For example MyApp/.
Availabe Scripts
These scripts refer to the different stages of developing an application:
start: Start Previous.js in live mode for development and production servers.build: Build the entire application into static files.
Start the Web Server
1. Open a terminal in the project folder (MyApp/) and start the web server running:
start.bat
./start.sh
2. Now you can open http://localhost:8888 in your browser to see your new web app alive.
Good to know
Press Ctrl+C twice to stop the web server.
By default Previous.js comes with a basic Hello World App.
App Routing
Previous.js uses file-system routing, which means the routes in your application are determined by how you structure your files.
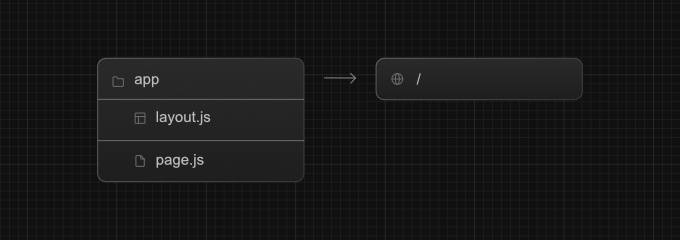
In app/ folder you will find two files, layout.js and page.js.

Learn more about using the router.
Creating your first App from scratch
First add the app/ folder into your project directory.
This folder contains the main project files and its structure represents the navigation of the router.
Now, create the root layout with this script:
return {
  content: ({ content }) => {
    return `
      <div class="container">
        <div class="main">${content}</div>
      </div>
    `;
  }
}
Finally, create a home page with some initial content:
return {
  content: (props) => {
    return `<h1>Hello, Previous.js!</h1>`;
  }
}
These files will be rendered when the user visits the root of your application (/).
Learn more ways to render contents with Previous.js.
Static Assets
Create the public/ folder to store static assets such as images, fonts, stylesheets, vendor libraries, custom scripts, etc.
Files inside public/ directory can then be referenced by your code starting from the base URL (/).
Learn more about the project structure.
Good to know
If you forget to create
layout.jsorpage.js, Previous.js will show an error. This files are required to run a basic web app.
Development Server
As we saw before start the application with the command:
start.bat
./start.sh
Once you have started the web server, any change made in the files inside the app/ directory will be updated.
To see the changes you have to press F5 or Ctrl+R to reload the page.
Important!
There is no hot reload, it is absolutely unnecessary and consumes a lot of memory and processor capacity.
The start command allows enter a parameter to specify which PORT use to run the server. For example:
start.bat 8920
./start.sh 8920
The server will run at http://localhost:8920.
Production Server
Not recommend! but, if you still want to use in production, execute this command:
start.bat > log.txt
./start.sh > log.txt &
In this example, all requests to the web server will be logged into the file log.txt.
But in a real production server this file could grow too much, so you will need to create a better log system to have a good control.
Warning!
If the application crashes, it will not recover automatically.
Learn more about Running Dynamic Web Apps
Build Static Files
Once your project is ready to be published run the following command into the project folder:
build.bat
./build.sh
Wait the process to be completed and all the static files will be ready into the build/ folder.
Warning!
All files and directories in
build/will be removed when starting build process.
Learn more about Building Static Websites.
