Rendering
Any route in your app represents a full HTML web page that will be rendered using the special files page.js and layout.js.
Pages
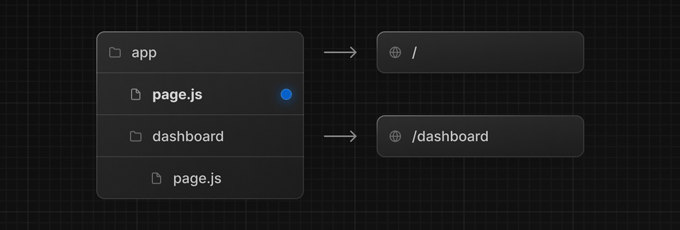
A page is UI that is unique to a route. You can define pages by exporting a component from a page.js file. Use nested folders to define a route and a page.js file to make the route publicly accessible.
Create your first page by adding a page.js file inside the app directory:

// `app/page.js` is the UI for the `/` URL
return {
  content: (props) => {
    return `<h1>Hello, Home page!</h1>`;
  }
}
// `app/dashboard/page.js` is the UI for the `/dashboard` URL
return {
  content: (props) => {
    return `<h1>Hello, Dashboard Page!</h1>`;
  }
}
Good to know
- A page is always the leaf of the route subtree.
- A page is always a Server Component.
.jsand.htmlfile extensions can be used for creating Pages.- A page file is required to make a route segment publicly accessible.
- Never use
<html>,<head>or<body>tags. Previous.js manage these tags for you.
You can also create pages with pure HTML like this:
<h1>Hello, Home page!</h1>
<h1>Hello, Dashboard Page!</h1>
By using ${props.*} syntax you can render page properties into the HTML content.
Important!
When having
page.jsandpage.htmlin the same directory, only the HTML file will be used to render the content and the magic methodcontentwill be ignored.
Layouts
A layout is UI that is shared between multiple pages. Layouts can also be nested.
You can define a layout by creating layout.js file. The component should accept a content prop that will be populated with another layout (if it exists) or a page during rendering.

return {
  content: ({ content }) => {
    return `<main>
      <nav class="main-menu">
        <span>Logo</span>
        <ul>
          <li><a href="/">Home</a></li>
          <li><a href="/dashboard">Dashboard</a></li>
        </ul>
      </nav>
      <content>${content}</content>
    </main>`;
  }
}
Good to know
- The top-most layout is called the Root Layout. This required layout is shared across all pages in an application.
- Any route segment can optionally define its own Layout. These layouts will be shared across all pages in that segment.
- Layouts in a route are nested by default. Each parent layout wraps child layouts below it using the
contentprop.- Layouts are always Server Components.
- You can pass data from page to its parent layouts.
.jsand.htmlfile extensions can be used for Layouts.- A
layout.jsandpage.jsfile can be defined in the same folder. The layout will wrap the page.- Never use
<html>,<head>or<body>tags. Previous.js manage these tags for you.
Layouts can also be created with pure HTML like this:
<main>
  <nav class="main-menu">
    <span>Logo</span>
    <ul>
      <li><a href="/">Home</a></li>
      <li><a href="/dashboard">Dashboard</a></li>
    </ul>
  </nav>
  ${props.content}
</main>
In this example the content is rendered with ${props.content}. All HTML files will have access to page props using this syntax. This render method use the read function.
Important!
When having
layout.jsandlayout.htmlin the same directory, only the HTML file will be used to render the content and the magic methodcontentwill be ignored.
Nesting
Layouts in the file hierarchy are nested, which means they wrap child layouts via their content prop.

return {
  content: ({ content }) => {
    return `
      <nav class="lateral-menu">
        <ul>
          <li><a href="/dashboard/section-1">Section 1</a></li>
          <li><a href="/dashboard/section-2">Section 2</a></li>
          <li><a href="/dashboard/section-3">Section 3</a></li>
        </ul>
      </nav>
      <section>${content}</section>
    `;
  }
}
If you were to combine the two layouts above, the root layout (app/layout.js) would wrap the dashboard layout (app/dashboard/layout.js), which would wrap route segments inside app/dashboard/*.
The two layouts would be nested as such:

The resulting page will looks like:
<html>
...
<body>
  <main>
    <nav class="main-menu">
      <span>Logo</span>
      <ul>
        <li><a href="/">Home</a></li>
        <li><a href="/dashboard">Dashboard</a></li>
      </ul>
    </nav>
    <nav class="lateral-menu">
      <ul>
        <li><a href="/dashboard/section-1">Section 1</a></li>
        <li><a href="/dashboard/section-2">Section 2</a></li>
        <li><a href="/dashboard/section-3">Section 3</a></li>
      </ul>
    </nav>
    <section><h1>Hello, Dashboard Page!</h1></section>
  </main>
  </body>
</html>

All the contents will always render from page to each parents layouts. This order is important when using props, so you can set information in page segment and use it later in a parent layout.
Remember!
Never use
<html>,<head>or<body>tags. Previous.js manage these tags for you.
